
Saturday, May 22, 2010
Sunday, May 16, 2010
Time to Bottle
Racking the Beer
We are coming down the home stretch for home brewing. You've created the wort and have let the yeast ferment your brew. After two weeks (longer for lager) aging the beer in the secondary fermentation container (carboy), you are ready to bottle. **You could also keg at this point, put we do not have the know-how or equipment for putting the beer in a keg.
You will need bottles, but they don't have to be brand new. We have set aside 60 bottles from various commercial beers. The most important attributes of the bottles are: 1) completely in tact, 2) NOT screw top, 3) clear of sediment. You should test one or two of your bottles with your bottle cap and capper, just to make sure the bottle and cap are compatible.
 Before racking (bottling), you need to place 50-60 bottles (new or used) in the dishwasher. DO NOT ADD SOAP, but run the bottles through a complete cycle utilizing heated drying. This sterilizes the bottles. If you do not have a dishwasher, you can purchase a bottle cleaning attachment for your kitchen sink.
The last part gets a little crazy, because a lot of components are coming together. You will want to sanitize the primary fermentation bucket, siphon, hose, and bottle racker. Wrap the bottle racker with plastic wrap for the time being.
Get a sauce pot out and boil 1 cup of corn sugar in one pint of water. Boil steadily for 10 to 15 minutes, but do not let the water completely evaporate. You will add this solution to the beer to wake the yeast back up. The extra food will help carbonate and pressurize the bottles.
 In a second sauce pot, boil 60 bottle caps in enough water to cover the caps. Once the caps have been 'dancing' for a minute, remove the heat. The bottle caps are now sanitized.
One last time, you will transfer the beer from one container to another. Place the carboy on the counter and set up the siphon and tube. Transfer the beer from the carboy to the primary bucket on the floor. As with the last transfer, make sure you put the hose in the bottom of the primary. Make sure you keep the siphon off of the bottom of the carboy - you do not want to suck up sediment. Once this transfer is complete, add the sugar water solution to the bucket.
 Now you can bottle. Place the bucket with the siphon and tubing on the counter, above the dishwasher. Attach the racking device and open the dishwasher door. You'll want to fill the bottles over the door, because it helps to catch any spills. Take the plastic wrap off of the racker, get the beer flowing and you are ready to bottle.
The auto-racker only lets beer flow when the bottom is completely pushed in. Once you pull up on it, the flow will stop. Allow the beer to fill the entire bottle. The racker displaces enough volume, so when it is removed, you will have some space in the bottle.
 It is best to work with a friend. Hand the filled bottle to your friend and have them cap the bottle. Make sure the bottle cap is seated on the top of the bottle, then set the capper on the cap and bottle. Push the levers down until the cap's edges have crimped around the bottle opening. You have now completely bottled your first beer.
 Continue this process until you have used all the beer, or as much can fill a complete bottle. Place your bottle beer into crates or other storage devices... whatever will make the bottle transport easiest.
For ales, you will want to store this at room temperature (68 to 74 deg F) for at least 2 weeks for further aging (lagers take longer, up to a month in colder storage situations). Refrigeration slows down the carbonation and aging process, so don't be in a rush to put all 50+ bottles in the fridge. I would suggest, after two weeks, moving about 6 bottles to the fridge at a time. You may want to refrigerate the remaining bottles only after 16 to 20 weeks to keep them fresh (if they last that long).
 The final step... take one of your chilled brews out of the fridge, get your favorite beer glass out, poor the beer and enjoy!
Update: Part 1, Part 2, and Part 3
Thursday, May 13, 2010
Brewtime!
Fermenting
When we left off, we were cooling the wort. Now it is time for the yeast to take over and finish the beer. Not only does yeast add alcohol and carbonation to the beer, it also adds extra flavor profiles to the overall taste.
Yeast is a living organism. Like all organisms, yeast need food and shelter. Well, we made them food (wort) and a place to live (fermentation bucket). To make it a total party, we even made the temperature sit around 70 deg F for ale yeast (50 deg F for lager yeast). So, don't the them wait, add the yeast!
 You can get dry yeast or liquid yeast to ferment your beer. Dry yeast is slightly easier to add and takes a shorter amount of time. Just open the packet, poor in the yeast, and seal up the fermentation bucket. (fun side note, adding yeast is also know as 'pitching')
Liquid yeast is harder only because you need to keep it refrigerated until about 3 hours before pitching the yeast. Let the yeast warm to room temperature, then shake the vial. Once all the yeast has broken up, it is ready to pitch. Pour it in the fermentation bucket, then seal it up.
When the yeast get to eating, they will start producing CO2. After a few hours enough pressure will build up and the airlock will start to 'burp'. At full production, the burping will come at a regular interval. This primary fermentation will last a few days. Once the burping reduces to about once every 90 minutes, you are ready to transfer (rack) the beer to the secondary container. Make sure to sterilize your carboy, siphoning tube, stopper, and siphon.
 Place the primary on a counter and remove the lid. The carboy will rest on the floor below (let gravity be your friend). Put the siphon halfway into the primary, attach the hose, and place the hose into the BOTTOM of the carboy. You don't want the siphon to touch the bottom of the primary bucket, because of all the sediment that has precipitated out of the first batch of fermentation. You want the hose to be in the bottom of the carboy to avoid splashing. Adding too much air to the brew will make the beer taste funky. Stop siphoning once you have about an inch of brew remaining in the primary. Go ahead and dump the sediment.
 Place the airlock and stopper in the carboy. Put the carboy in a safe place, away from sunlight. This stage allows the beer to clarify and age. You will want to age the beer about 2 weeks for ales and about a month for lagers. The yeast will not be as active, but will produce enough CO2 for a few burps out of the airlock. After the allotted aging time, you will be ready to bottle.
to be continued ...
Update: Part 1, Part 2, and Part 4
When we left off, we were cooling the wort. Now it is time for the yeast to take over and finish the beer. Not only does yeast add alcohol and carbonation to the beer, it also adds extra flavor profiles to the overall taste.
Yeast is a living organism. Like all organisms, yeast need food and shelter. Well, we made them food (wort) and a place to live (fermentation bucket). To make it a total party, we even made the temperature sit around 70 deg F for ale yeast (50 deg F for lager yeast). So, don't the them wait, add the yeast!
 You can get dry yeast or liquid yeast to ferment your beer. Dry yeast is slightly easier to add and takes a shorter amount of time. Just open the packet, poor in the yeast, and seal up the fermentation bucket. (fun side note, adding yeast is also know as 'pitching')
Liquid yeast is harder only because you need to keep it refrigerated until about 3 hours before pitching the yeast. Let the yeast warm to room temperature, then shake the vial. Once all the yeast has broken up, it is ready to pitch. Pour it in the fermentation bucket, then seal it up.
When the yeast get to eating, they will start producing CO2. After a few hours enough pressure will build up and the airlock will start to 'burp'. At full production, the burping will come at a regular interval. This primary fermentation will last a few days. Once the burping reduces to about once every 90 minutes, you are ready to transfer (rack) the beer to the secondary container. Make sure to sterilize your carboy, siphoning tube, stopper, and siphon.
 Place the airlock and stopper in the carboy. Put the carboy in a safe place, away from sunlight. This stage allows the beer to clarify and age. You will want to age the beer about 2 weeks for ales and about a month for lagers. The yeast will not be as active, but will produce enough CO2 for a few burps out of the airlock. After the allotted aging time, you will be ready to bottle.
to be continued ...
Update: Part 1, Part 2, and Part 4
Tuesday, May 11, 2010
Adding the Seasonings
Hops are the spice of beer. Hops add bitterness and extra levels of aroma to beer.
Now that you have your malt wort boiling, you can add the hops. Depending on the recipe, you can add one type of hop in stages or multiple hop types. Hops added early to the boil are the bittering/flavor component, while late-stage hops are for the aroma.
 Get a timer out and set it for 60 minutes. With the wort at a rolling boil, add the first stage of hops (usually 1 oz for a 5 gallon batch) and hit start on the timer.
 Stir occasionally. The recipe will prescribe at what point in the count-down you should add more hops.
While you are between hop additions, you will want to sterilize your fermentation bucket, stopper, airlock, and strainer. You could use bleach, but Iodophor is recommended. Iodophor is a food-safe sanitizer. As I mentioned in the last post, you want to keep things as sterile as possible. Weird flavors could be added by stray 'bugs' on the counter.
 Now, put some towels on the floor, around the fermentation bucket. The strainer will sit on the top of the bucket. Once the 60 minutes is up on the wort, turn off the heat and temporarily cover the stock pot. Cut open the frozen gallon of water and add it to the bucket. Put the strainer on top of the bucket and pour the wort through the strainer. It is important to strain all hops out of the wort - you don't want debris in your fermentation bucket. Add enough extra water to get the bucket up to 5 gallons of fluid. Add the water through the strained hops to pick up extra flavor.
 Once you have 5 gallons, throw out the hops, put the lid, stopper, and airlock on the bucket. Add a little bit of water to the airlock to keep air from getting into the fermentation bucket. Make sure everything is on tightly. DO NOT add the yeast yet. You need to wait until the temperature of the wort has dropped to at least 80 degrees Fahrenheit.
To be continued ...
Update: Part 1, Part 3, Part4
Sunday, May 9, 2010
Let's Begin!
Making beer is a relatively easy process (after all we did it). All you really have to do is make food for the yeast, then the yeast does the rest (more or less). The most important practice you need to remember is keeping things sanitary. Figure out what kind of beers you like, and what kind of beers you would like to make. The folks at your local homebrew store can help you put together the equipment and ingredients.
So, you have your equipment and ingredients. The night before you brew, put one gallon of spring water in the freezer, bottle and all. Make sure it completely freezes. This will help later in the brewing process.
Mashing
During this step, you will take your malted grain and malt extract, add it to water, and apply heat. If you want to get really fancy, you could roast and grind your own malts. That is really for advance users (not us), so just get the milled malt (grist) from your homebrew supply store. The result of the process will be wort.
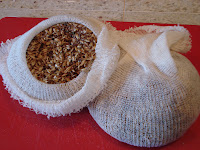 Put the milled grain into cheesecloth socks, tie them off, and put them in a stockpot with 3 gallons of water.
H eat the grains and water to 180 deg Fahrenheit. At this point the water should have turned grain-colored. Remove the socks and bring the wort to a boil.
 Once the wort is boiling, carefully add the malt extract. Be sure to continually stir the wort so the extract does not burn on the bottom of the pot.
 You also want to keep on eye on the wort - foam can start to build and spill over the top. If the wort does start to foam too high, just remove the pot from the heat source until the foam settles. Once the foam process has subsided (its okay if you don't get towering foam), bring the wort to a rolling boil. At this point you will add the hops to the wort.
To be continued...
Update: Part 2, Part 3, Part4
So, you have your equipment and ingredients. The night before you brew, put one gallon of spring water in the freezer, bottle and all. Make sure it completely freezes. This will help later in the brewing process.
Mashing
During this step, you will take your malted grain and malt extract, add it to water, and apply heat. If you want to get really fancy, you could roast and grind your own malts. That is really for advance users (not us), so just get the milled malt (grist) from your homebrew supply store. The result of the process will be wort.
 Put the milled grain into cheesecloth socks, tie them off, and put them in a stockpot with 3 gallons of water.
H
 eat the grains and water to 180 deg Fahrenheit. At this point the water should have turned grain-colored. Remove the socks and bring the wort to a boil.
 Once the wort is boiling, carefully add the malt extract. Be sure to continually stir the wort so the extract does not burn on the bottom of the pot.
 You also want to keep on eye on the wort - foam can start to build and spill over the top. If the wort does start to foam too high, just remove the pot from the heat source until the foam settles. Once the foam process has subsided (its okay if you don't get towering foam), bring the wort to a rolling boil. At this point you will add the hops to the wort.
To be continued...
Update: Part 2, Part 3, Part4
Saturday, May 8, 2010

Wednesday, May 5, 2010
Our adventure in beermaking

As we mentioned back in March, we have entered the world of home brewing. In honor of the recent "National Homebrew Day", we've decided to (finally) post our beer making process. Instead of cramming all the information into one giant post, we decided to break up the process over a series of entries.
First of all, you need to locate a homebrew supply store. We were fortunate enough to find one that not only has good supplies, but also has a very informative website. There are some initial hardware costs, but the equipment should last you a good while. The ingredients aren't that expensive, so you can get your beer down to under a dollar a bottle. Basic equipment include a stock pot, food-grade bucket with lid, and beer bottles. As for ingredients, its simple:
Malted grain + water + heat + hops + yeast = BEER!
Stay tuned this week for a breakdown of the steps.
Update: Part 1, Part 2, Part 3, and Part4
Saturday, May 1, 2010

Subscribe to:
Posts (Atom)